
Jarida Theme Documentation
Instant Download | Unlimited Usage | Access All New Products
Installation
Uploading Jarida via FTP to WordPress
- Download the zipped theme pack to your local computer from ThemeForest and extract the ZIP file contents to a folder on your local computer.
- In the extracted folder you will find ‘Jarida.zip’ Extract this file.
- Using an FTP client to access your host web server
- Upload the Theme files in the extracted folder called ‘Jarida’ to the wp-content/themes directory provided by WordPress.
- Visit Administration > Appearance > Themes, under the Manage Themes tab, under the Available Themes, if necessary navigate to the page displaying that Theme, then click the Activate link to make the Theme, the Current Theme.
Installing Jarida From the WordPress Dashboard
- Download the zipped theme pack to your local computer from ThemeForest and extract the ZIP file contents to a folder on your local computer.
- Log into your WordPress admin panel and click on the “Appearance” tab.
- Now click on the “Add New Themes” tab.
- Click on the “Upload” button, “Browse” for file called Jarida.zip In the extracted folder select “Open”.
- Click the “Install Now” button.
- Activate the theme from this page, OR “Return to Themes Page” and activate from there
Updating WordPress Theme
This theme may be updated periodically in order to add new features and fix bugs. When a new update be avilable an update message will appears on your blog dashboard . As a customer, you can download the most current version from your ThemeForest account.
Updating Automatically
Envato has developed the Envato Toolkit Plugin for WordPress. You can use this to receive notification of updates to themes purchased from ThemeForest and to automatically update (upon clicking) directly from within your WordPress admin area.
- Download the plugin zip file to your computer.
- In your WordPress admin area, go to Plugins > Add New then click Upload.
- Click Choose File, select the plugin zip file you downloaded and click Install Now.
- After installation, click Activate.
- Click the new Envato Toolkit link in the menu and follow the instructions to configure the plugin.
Updating Manually
- Download the most current version from ThemeForest in the “Downloads” area of your account.
- Unzip the package and locate Jarida.zip in the theme folder.
- Go to Appearance > Themes and activate another theme such as the default WordPress theme.
- Delete the Jarida theme which is now inactive.
- Go to Install Themes > Upload then install and activate Jarida.zip from the new package.
Installing Sample Content
Automatic Demo Site Data Importer
Importing demo data (post, pages, images, theme settings, …) is the easiest way to setup your theme. It will allow you to quickly edit everything instead of creating content from scratch.
- Go to Dashboard > Jarida > Import Demo Data
- Click on the “Import Demo Data” button .
Manually By uploading the XML file
- Go to Dashboard > Tools > Import > WordPress
- Install the plugin.
- Use it to upload the sample content XML file.
Migrating From Another Theme
If you are migration from a theme which used the native featured images functionality of WordPress. Please use the Regenerate Thumbnails plugin to resize all the thumbnails. Click the link above and download the free plugin, and read through the steps it contains, it has all the information you need.
Language Translations
All of our Themes are able to be translated into any language. The process of translating the theme is a user responsibility. The following instructions are given as guidance.
- Open wp-config.php and replace this:
define ('WPLANG', '');with this (subsitute the language string (bg_BG) with your own!):define ('WPLANG', 'bg_BG'); - Download and install POEDIT
- Connect to your site -> open your theme/languages directory
- Download the default.po file and open it with POEDIT.
- Translate file and save it as bg_BG (the file name must match with the string you inserted into wp-config.php)
- Two files will be generated after save. bg_BG.po and bg_BG.mo
- Upload the .mo and .po files into wp-content/themes/your-theme/languages folder
How to activate the RTL Version
You just need to install the theme on the RTL WordPress blog and it will adjust automatically .. check this page for more information.
Theme Navigations
This Theme uses wordpress built-in menus feature which can be found in your wordpress dashboard > appearance > menus. To setup a new menu, please follow the steps below. Its best to already have your pages created, even if they are blank pages.
- Navigate to Apperance > Menus page
- Click the “create a new menu” link to make a new menu. Enter the name then hit Create Menu
- To add a menu item, you can easily select one of your already made pages on the left hand side and click Add to Menu
- You can also add menu items by entering a custom name and custom link into the Links box.
- You can manage your menus using the drag and drop functionality. To create a dropdown menu, simply drag a menu item below and slightly to the right of another menu item and it will lock into place and create a dropdown section.
- After setting up your menu, select the menu you just created as the Primary Navigation in the Menu Settings and Create a new menu and select it as the Top Menu Navigation in the Menu Settings
- Once its all done, make sure you click the Save button.
- You can chnage menus locations in any time from Manage Locations tab .
Categories Mega Menus
- Add the Category you want to the Main Nav menu .
- Navigate to Posts menu > Categories .
- Edit the category you want .
- From the Jarida – Category Settings box .
- Enable Mega Menu option
Uploading Your Logo
- Navigate to Jarida Settings page > Header Settings tab .
- From the Logo box set Logo Setting option to Custom Image Logo .
- Click Upload and Select your logo image to upload.
- Once uploaded click “Use this image” .
- Make sure you’ve selected “Full image” for the image size.
- Also you can upload a logo for the Retina devices . It should be 2x the size of main logo.
Homepage Builder
- From WordPress Settings Menu > Reading .. Make sure that Front page displays option is set to Your latest posts
- Navigate to Jarida Settings page > Homepage tab .
- From the Home page displays box set Home page displays option to News Boxes – use Home Builder .
- From the News Boxes Settings box set the First News Excerpt Length in the news boxes and the posts meta info that appears below posts titles.
- From the Home Builder box you can add the boxes you want to appear in the homepage also you can re-sort the boxes .
- Change the boxes options as you want.
Homepage Slider
Here we go! WordPress’ Live Theme Customizer Options Panel is a main advantage of Aden Theme. Go to Appearance > Customize and see the magic :). All theme options are located here. I won’t exlain each control in details, because they are self-explanatory and each sections is pretty simple to understand how it works. From the Theme Customizer you can add Custom CSS for special purposes and also Google Analytics code too.
Theme has possibility of uploading the header background image, which will be displayed on all pages. If you want to have different header background image in specific page, it’s necessery to go to editing screen (admin panel) of this page and upload image on each page.
Custom Sliders
Custom Sliders allow you to add slides with custom image , title , caption and link .. so you can use it as a main slider on the homepage or on a single post .
- Navigate to Custom Sliders > Add New .
- Add a title for the slider
- use Add New Slide button to add a new slide
- Choose the slide image from your existing images in the media library or upload a new one and click Use this image button
- Enter your slide title , link and caption
- use Add New Slide button again to add new slides
- Once its all done, make sure you click the Publish / Update button.
Sidebar Manager
The Sidebar Manager enables you to create a unique sidebar for specific posts, pages, archives and categories .
- Navigate to Jarida Settings page > Sidebars tab .
- From the Sidebar Position box set the default sidebar position .
- From the Add Sidebar box type your sidebar name and click Add button.
- From the Custom Sidebars box assign your Custom sidebar to Home , posts , pages or archives .
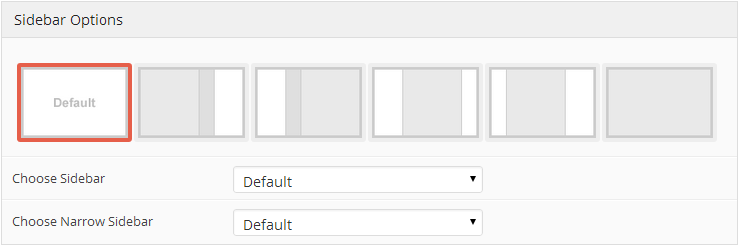
Set Custom Sidebar for posts/pages.
From post edit page , Select your custom sidebar from the Sidebar Options box As shown in below screenshot
Featured Images
All of your posts must have a featured images .. these images will appears in the slider , homepage news boxes , sidebar .. etc


